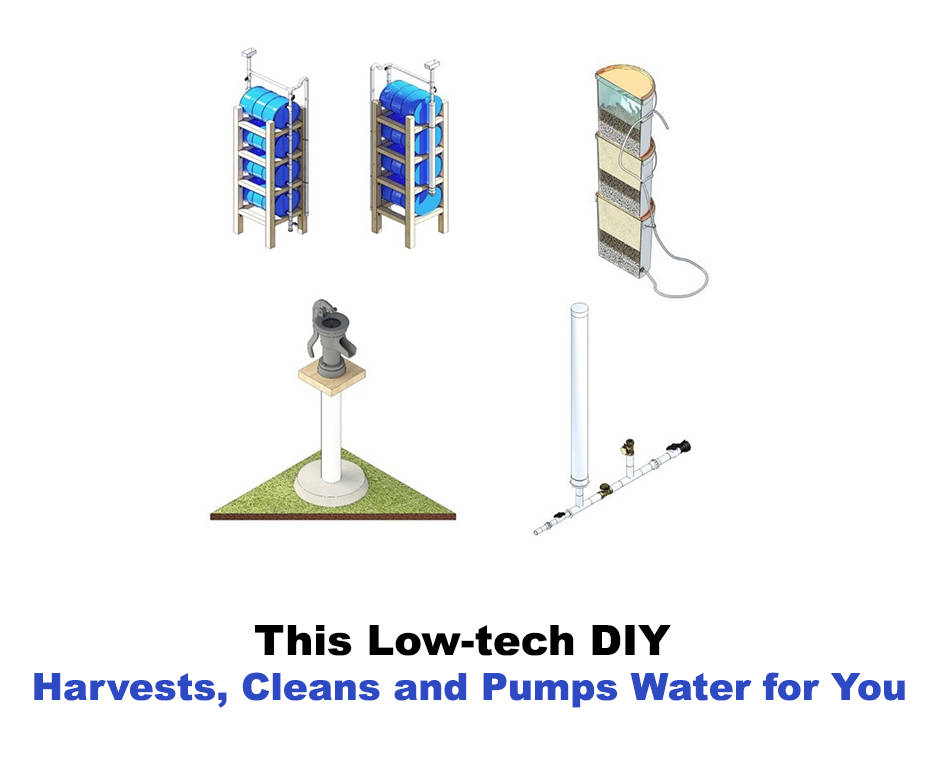
Survivalist Pro
Photo by Marcus Aurelius Pexels Logo Photo: Marcus Aurelius

How do you build the best shelter in Survivor?

How to Build the Shelter: Find one long, sturdy branch. It should be a few feet longer than your height. Prop one end of branch up on a tree stump or log. ... Lean shorter branches against the branch. ... Now cover the frame with leaves, branches, or other brush.

How hard is SERE training?

It is extremely difficult to become a SERE specialist. SERE specialists provide initial training to all Airmen at the Air Force Survival School at...

Read More »
Who lived to be 200 years old?

Li Ching-Yuen Li-Ching Yuen Born May 5, 1736 Died May 6, 1933 Sichuan, Republic of China Occupation Herbalist Known for Extreme longevity claim and...

Read More »

4513 shares 218

4295

Shelter is your #1 survival priority (even more so than emergency food or water!), so knowing how to make a survival shelter is something everyone should know. Here we show you how to build a survival shelter with 11 simple designs that could save your life. Some require a tarp, and some use only debris and wood that has been scavenged. Don’t forget to practice it so you’ll be prepared should you ever need this survival skill!

Step 1: Choose Your Site

Choose a spot for your wilderness shelter which is:

Dry

Dry Flat

Flat Not right next to a body of water.

Not right next to a body of water. Not underneath any cliffs, falling rocks, or dead limbs which could fall on you Not underneath any cliffs, falling rocks, or dead limbs which could fall on you Is readily visible or very well hidden (depending on whether you want to be found or not) Is readily visible or very well hidden (depending on whether you want to be found or not) Have a good place for a fire right in front of the doorway (see how to start a fire without matches.) A note about choosing a flat site for your shelter. This is not just for comfort! If your shelter is on a slope and it starts raining, rainwater can come into your shelter. If you cannot find a flat spot for building your shelter and rain is likely, you will need to dig trenches to divert the water away from the shelter.

Step 2: Assess Your Needs

Many wilderness survival experts will tell you that this or that method is the best survival shelter. However, it depends on your needs.

Here are some of the things you need to consider:

How many people are in your group?

Does your shelter need to be camouflaged?

How cold is it? Will you build a fire inside or directly in front of your shelter?

How much time do you have to make the shelter?

Is the shelter for long-term or short-term use?

Tools

While not essential, it will be a lot easier to make these shelters if you have some basic tools available:

Step 3: Decide On a Type of Shelter

This is the most essential part of building a shelter in the wilderness. If you know a few shelter designs AND know what they are best suited for, you will be able to make the right choice.

1. The Tarp Shelter

You just need a plastic tarp and some cordage for this survival shelter. You can even make it with a rain poncho in a pinch. Just tie each end of the tarp to a tree.

Pros Fastest to build

Fastest to build Very easy to build

Very easy to build Good for larger groups Cons

Poor protection from wind and rain

Poor protection from wind and rain Could easily break from falling sticks, hard rain, etc. Could easily break from falling sticks, hard rain, etc. No protection from animals

2. Tarp Tent

Just tie some cordage between two trees and drape your tarp over it. Then use some rocks, sticks, or more cordage to anchor the sides of the tarp away from you. Read our guide to survival tarps.

Pros Fast and easy to build

Fast and easy to build Protects from rain

Cons Only moderate protection from wind

Only moderate protection from wind Could easily break from falling sticks, hard rain, etc. Could easily break from falling sticks, hard rain, etc. No protection from animals

3. Tarp Teepee with Poles

You need to gather some long branches (your poles) and prop them together to form the structure for the teepee (practice this; it is a bit trickier than it may seem to make the structure sturdy!). Then wrap your tarp around the poles. If it rains, some rain will fall through the hole where the poles meet. You can fix this problem by draping another tarp or poncho over the top. Or, make a bigger hole, and you can even have a fire inside your teepee!

Pros Suitable for larger groups

Suitable for larger groups Good protection from elements

Good protection from elements Sturdy

Sturdy Possible to have a fire inside teepee; suitable for winter situations

Cons Requires some practice to build

Requires some practice to build Need very large tarp

Need very large tarp Will be a hole at top of the teepee where rain can enter

4. Tarp Teepee (no poles)

Fold your tarp into a triangular shape. At the point of the triangle, put a rock into the tarp. Then tie some cordage around the stone. Now hang this cordage from a tree. Anchor the bottom of the tarp down with rocks, and you’ve got yourself a teepee.

Why humans Cannot live forever?

Some scientists believe that within the next few decades, it could be possible for humans to live 1,000 years or more. Normally, as time passes,...

Read More »
How do you know if you have achieved enlightenment?

Here are the 10 signs you have reached enlightenment! Your are truly happy. ... Pain and pleasure no longer affect you and control your emotions....

Read More »

Pros Good protection from elements

Good protection from elements Tree overhead provides additional shelter

Cons Need a very large tarp, or else it will be a very small shelter Need a very large tarp, or else it will be a very small shelter Can be tricky getting cord tied to tree branch

5. Snow Shelter

What do you do in an emergency outdoors in the snow?

It will be too cold to spend much time making a shelter—this survival shelter you can make very fast (especially if you have an emergency shovel). Find a tree and prop a branch against its trunk at a 45-degree angle. Push the snow out of the way to form a “wall.” Prop another branch to support your tarp. Then drape a tarp over the branches. You can line the inside of this survival shelter with pine needles and brush to act as insulation and keep you warm. For an alternative that takes much more time, see how to build a snow cave.

Pros Suitable for winter survival situations

Suitable for winter survival situations Can be made bigger or smaller depending on group size

Cons Moving snow can be time-consuming and draining without a shovel

Moving snow can be time-consuming and draining without a shovel Can’t keep a fire burning inside; a teepee might be a better option

6. Fallen Tree Shelter

This is my favorite survival shelter because it can be easily adapted to the situation. It does rely on you being able to find a fallen tree, though. You can do it in multiple ways, such as draping a tarp over a fallen tree to make a tent. Or you can prop debris to act as your shelter wall. If windy or cold, use other debris to block the entrance.

Pros Easy to camouflage

Easy to camouflage Good protection from the elements, including snow

Cons Be prepared to share the shelter with bugs from the rotting log! Be prepared to share the shelter with bugs from the rotting log! Will take some time to gather debris to block off entrance

7. Hammock Survival Shelter

Jungle shelter

Sometimes you need your survival shelter to be off the ground, such as in jungle situations with creepy-crawly insects and animals around. This survival shelter design is perfect for that. It is a variation of the tarp tent, just off the ground. Line the survival hammock with your extra clothes to provide some insulation.

Pros Off the ground

Cons Need hammock or extra tarp and cordage for hammock

Need hammock or extra tarp and cordage for hammock Not much protection from the elements

8. A-Frame Brush Shelter

This is an excellent short-term survival shelter for a single person because it is fast and easy to build. It is also easy to find materials for making it.

Pros One person

One person Fast to build

Fast to build Very easy to build

Very easy to build Camouflaged

Cons Temporary/short-term

Temporary/short-term Fire won’t warm inside the shelter

How to Build the Shelter: Find one long, sturdy branch. It should be a few feet longer than your height. Prop one end of branch up on a tree stump or log. Alternatively, you can prop it up on two shorter branches, making an A shape. Lean shorter branches against the branch. Now you have a frame. Now cover the frame with leaves, branches, or other brush. *You can also make this survival shelter against fallen trees. Or, prop up both ends of your long branch for a larger A frame shelter. With this method, though, wind can blow in from the sides, and it also won’t trap your body heat as well.

Here’s what the shelter frame design looks like

You can make a larger A frame shelter by building it between two trees Here’s what the A frame debris shelter looks like from the inside without the coverings added yet

9. Debris Tipi Shelter (Teepee)

You are probably familiar with this shelter design, and maybe you even made a few (I know I made them as a kid). These are relatively easy to build, but you’ll need to have a lot of long branches around. Another downside of the tipi shelter is that its high, vertical shape makes it relatively unstable during high winds. Because it is large, it won’t trap your body heat as well as a smaller brush shelter would.

Pros Easy to build

Who sold more Xbox or PS5?

The PlayStation 5 is currently ahead by 6.80 million units. The PlayStation 5 has sold 23.95 million units in 23 months, while the Xbox Series X|S...

Read More »
How do you train a monkey in the survivalist?

Press ZR on the Switch (or the equivalent button on other consoles) to open the monkey training menu. Throw a weapon to your chosen monkey with Y...

Read More »

Easy to build Suitable for larger groups of people

Cons Requires lots of long branches

Requires lots of long branches Not suitable for high winds

Not suitable for high winds Doesn’t trap body heat as well as some shelter designs Doesn’t trap body heat as well as some shelter designs Fire won’t warm inside the shelter Fire won’t warm inside the shelter Will need to use leafy branches for covering as leaves and brush tend to blow away How to Build the Shelter: Find three long branches that are relatively the same length. Prop these up to make a tripod frame. This can be somewhat difficult to do without a rope. Alternatively, you can prop the branches against a tree to make a modified tipi shelter. Add more long branches to the tripod you built. The more branches you build, the sturdier the frame will be. Remember to leave a gap for the doorway to the shelter. Keep adding branches, including shorter ones. There should be as few cracks as possible in the frame. Cover the frame with leafy branches. Brush doesn’t work very well for covering because it quickly blows away. Birch bark also works great for a covering – don’t peel all the bark away unless you are in an actual survival situation as it will kill the tree! If you do use brush for covering the tipi shelter, you’ll need to add more branches to the outside to prevent them from blowing away.

This tipi shelter was made with birch bark coverings

Here’s a modified version of the tipi shelter design. The branches are propped against a tree for more stability since no rope was used.

10. Debris Lean-To

Flexible branches were used to tie up this shelter

The lean-to shelter is easy to make and roomy. It doesn’t trap body heat, as well as a completely enclosed shelter. However, the wall of the shelter also acts as a fire reflector. If you make a fire in front of the shelter, the heat will bounce off the wall and keep you warm. To make it even better for cold weather, make a fire reflector/wind screen on the other side of your fire pit.

Pros Easy and fast to make

Easy and fast to make With the addition of a “raised survival bed” and wind screen, it can be suitable as a long-term shelter Cons Not very warm by itself; will need to make a fire and preferably also a windscreen/fire reflector Not very warm by itself; will need to make a fire and preferably also a windscreen/fire reflector Wind can get in from the sides

Wind can get in from the sides Not very camouflaged

For a practical demonstration, check this post where we went out into the woods to build a lean to shelter from scratch.

Here the sides protect against wind.

11. Brush Shelter with a Smoke Hole

Here’s a design for a round hut shelter with a smoke hole

There are a bunch of ways to make shelters with smoke holes. You could make a tipi-style shelter and leave a hole in the top. Or you could dig an earthen pit house shelter with a hole for a fire inside. Unless it is truly freezing cold, never make a fire inside your shelter! The risk of burning your shelter — and yourself — is too significant. If you do need to make a fire, it will need to be VERY SMALL and controlled.

Pros Many possible designs

Many possible designs Suitable for winter survival situations

Cons Takes a lot longer to build because the smoke hole decreases stability Takes a lot longer to build because the smoke hole decreases stability Higher learning curve Since there are so many ways to make smoke hole shelters, I won’t give you instructions here. I’ll save that for a later, more detailed post. Note that there are plenty of other ways to make a wilderness survival shelter without supplies.

Go out and try some!

That is the only way you can get a feel for which survival shelter is suitable for your unique situation. Have fun! Have you made a survival shelter before? How did it go? Let us know in the comments.

Is it better to drink sea water or urine?

Urine is 95% water and 5% sodium, chloride, potassium and urea. Although that sounds promising, consider that sea water is 96.5% water and 3.5%...

Read More »
Why do people wipe deer blood on their face?

Although some hunters believe “blooding” rituals are rooted in American Indian culture, they're more likely a custom passed down by European...

Read More »
What are some red flags when online dating?

Here are seven red flags you don't want to ignore when you meet someone new online. They ask you for money. ... They warn you about themselves. ......

Read More »
What is enough emergency supplies for at least three days?

Emergency Supplies Water, one gallon of water per person per day, for drinking and sanitation. Food, at least a three-day supply of non-perishable...

Read More »